The window seat is the most contested row assignment in flying. You stake your claim the moment booking opens, guard it through gate changes, and spend the entire flight with your face near the glass. There is a reason: that small oval is a portal to some of the most extraordinary views on earth, views that most people glance at and forget, and that photographers treat as a serious subject.
A camera phone and a window seat are all you actually need. Altitude gives you access to perspectives that no ground-based photography can replicate: the geometry of cities, the textures of cloud formations, the way light behaves above the weather. If you enjoy plane spotting from the ground, the window seat is the aerial counterpart you have been missing.
These 25 ideas cover every kind of in-flight shot worth planning for, from golden-hour wing silhouettes to abstract farmland geometry, from rain droplets racing the glass to moonrise at cruise altitude. Some need nothing but the right seat and good timing. Others reward a little preparation. Read through before your next flight and pick a few to look for.
01. The Wing at Golden Hour
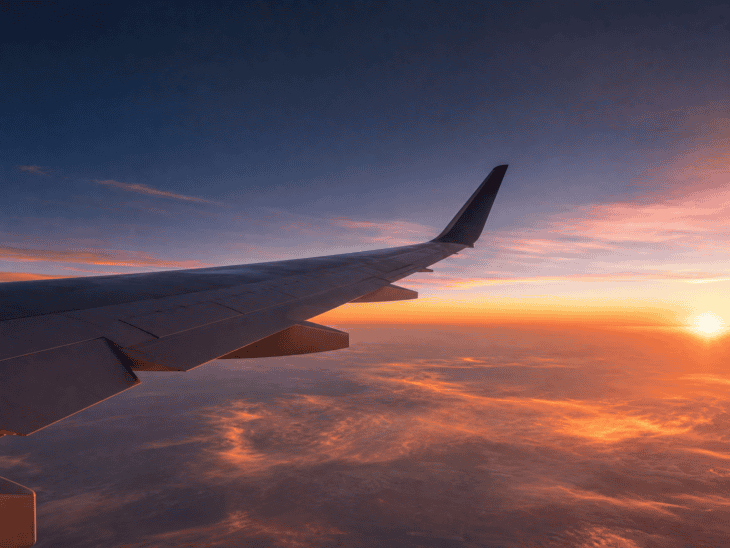
What you see A wing stretching into the frame from the left, glowing amber and rose-gold in the last light of the day. Thin wisps of cloud catch the same warm hues far below, while the sky graduates from deep twilight blue at the top of the frame to a vivid orange-rose at the horizon. The wing surface shows the gentle curve of its flex and just enough texture to feel real.
Why it works Golden hour from altitude is golden hour multiplied. There is no atmospheric haze to mute the colors, no buildings or trees cluttering the frame. The wing itself acts as a leading line, drawing the eye through the image while anchoring it to the experience of being on a plane rather than just photographing a sky.
How to get it Book a window seat on the side of the aircraft facing the setting sun and align your departure time so you are at cruise altitude during golden hour. On eastbound morning flights, try the sunrise equivalent on the opposite side. Hold the phone flush against the window to eliminate reflections from the cabin. Shoot in portrait orientation for a taller sky gradient, or landscape to emphasize the sweep of the wing.
02. Cloud Sea Below
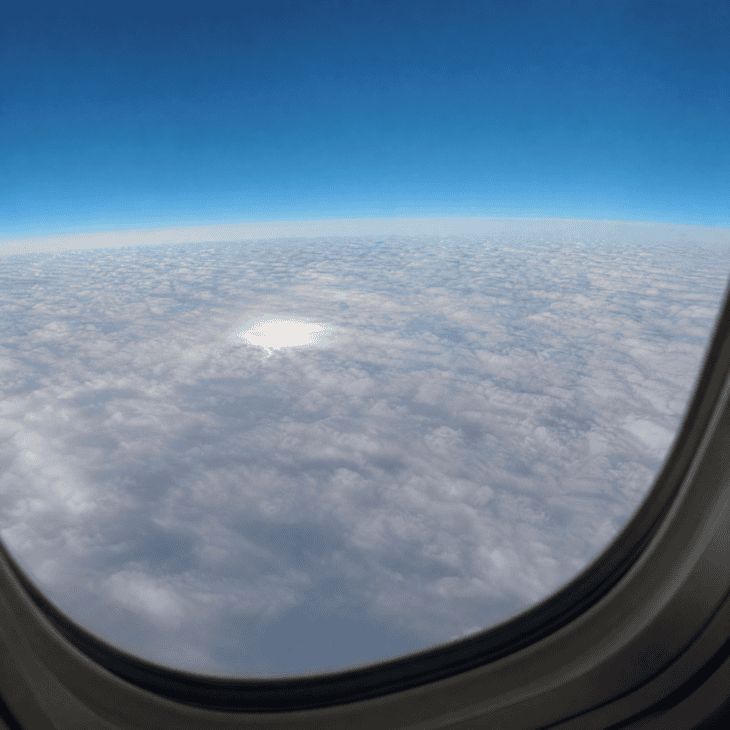
What you see An unbroken white plain stretching to every horizon, the surface of the overcast layer gently rolling and undulating like a slow-frozen ocean. Midday sun hits the cloud tops bright and clean, casting soft hollows and gentle shadows in the texture. A cool, clear blue fills the sky above. The ground beneath the clouds might as well not exist.
Why it works A solid overcast layer turns the world below into an abstract surface. The photo loses all geographic context and becomes purely about light, texture, and scale. Viewers have to orient themselves by the horizon and the blue sky to understand they are looking down rather than across a snowfield or salt flat. That disorientation is the point.
How to get it Overcast flights below 25,000 feet will not give you this shot since you will be inside the clouds. You need to be above the cloud layer, which happens on almost any flight that climbs above a low weather system. Shoot slightly downward through the window rather than straight out. Tap to expose on the cloud surface or the highlights will blow out. The shot works best when the cloud layer has texture rather than being perfectly smooth.
03. City Grid at Night
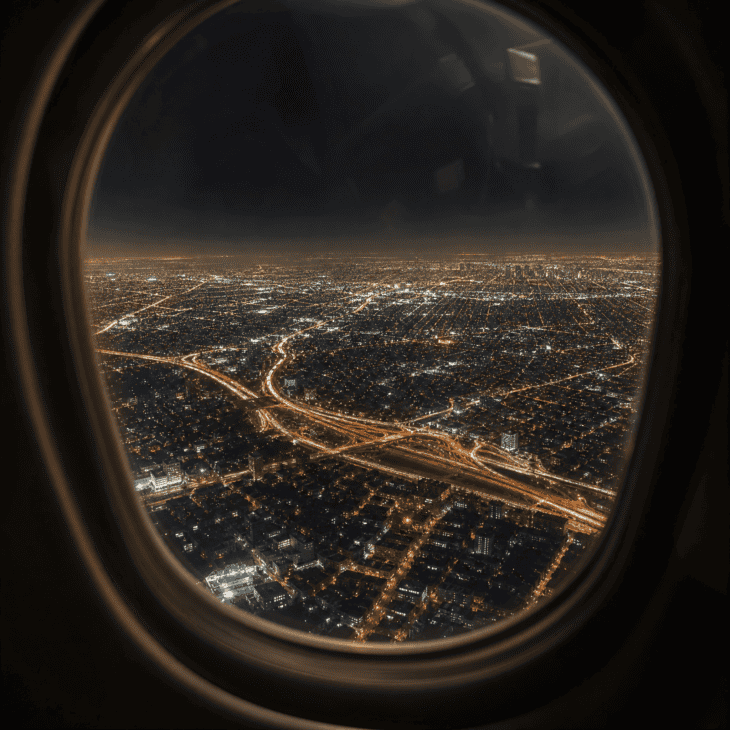
What you see A city spreads below in a glowing grid, thousands of amber and white points of light forming blocks, arteries, and parks visible only as dark voids. Highways glow brighter where headlights trail. The window frame creates a natural oval vignette around the scene. The faint reflection of the dark cabin interior doubles faintly in the glass, adding a layer of depth.
Why it works Night city shots from altitude have an unmistakable visual rhythm. The grid reveals the human logic underneath a city in a way that daylight hides. The image reads as both documentary and abstract, which is exactly why it lands so well as travel photography. Red-eye flights deliver this view on a guaranteed basis since the whole route happens in darkness.
How to get it Press the lens flush against the window glass to eliminate the reflection of the cabin interior. Tap to expose on the bright areas of the city, not the dark background, or the shot will be overexposed. Use night mode if your phone has it, but keep the stabilization pressed against the window to avoid blur. Shoot during approach or departure when the city fills more of the frame rather than appearing as a tiny cluster on the horizon.
04. Rain Droplets Racing the Glass
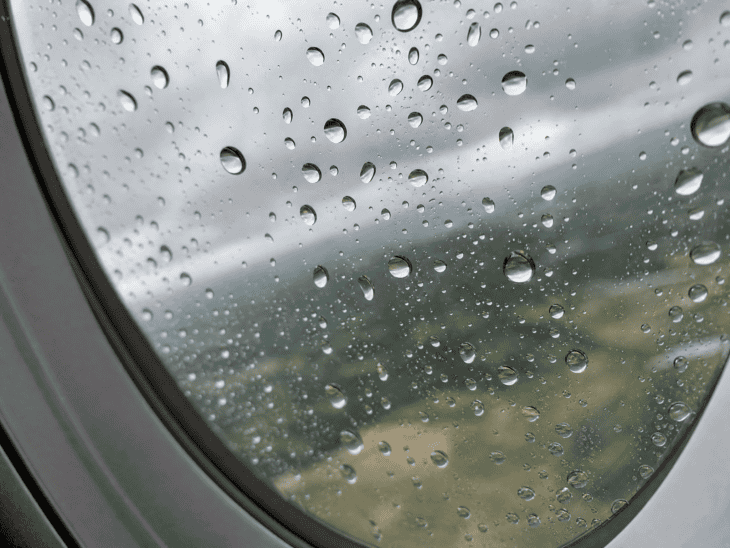
What you see The exterior surface of the window covered in dozens of water droplets of different sizes, each one a tiny lens refracting the blurred landscape below into a miniature upside-down world. The overcast light softens everything beyond the glass into smooth gray-green bokeh. The droplets cluster and trail toward the edges of the oval as the airspeed pulls them sideways.
Why it works This is an intimate shot that turns a passing weather event into a macro study. It works on almost any phone camera at close focus distance and tells a story about altitude and motion without showing the aircraft at all. The contrast between the sharp foreground droplets and the soft background landscape gives the photo depth without any technical effort.
How to get it You need rain either on the ground during taxi, or at low altitude on approach through a rain shower. The droplets only appear on the outer pane, so a phone held close will focus on them naturally. Tap to focus on the droplets specifically rather than the landscape beyond. The narrow window between boarding and the clouds clearing at cruise altitude is your opportunity for this shot.
Clean the inner pane
The inner window surface often has smudges and fingerprints that degrade every shot. A microfiber cloth in your carry-on takes care of this in 10 seconds at boarding. The outer pane takes care of itself.
05. Self-Portrait in the Dark Window
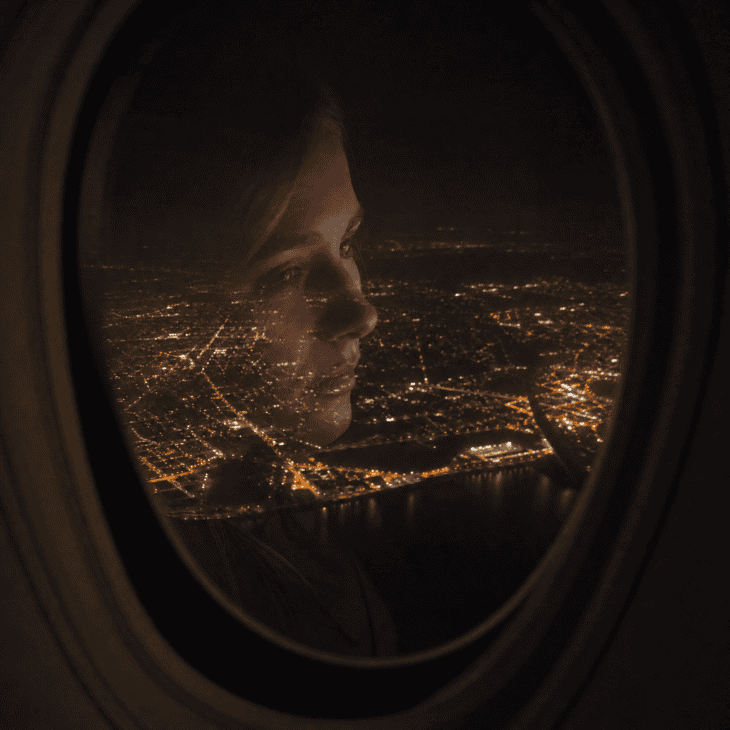
What you see A face in soft semi-transparent reflection, layered over the glow of a city far below. The reflection is not a mirror image but a ghost: the city lights show through the face as if both images occupy the same space. Ambient cabin light catches one side of the face in warm tones while the other fades into the dark of the window.
Why it works The double exposure effect happens naturally in aircraft windows at night and requires no editing. The layering of face over cityscape creates an instant visual metaphor about travel: being present in one place while looking down on another. It is one of the most-saved travel photos on social platforms because it is specific to the experience of flying at night.
How to get it Turn the cabin reading light off and dim your phone screen before shooting so the brightest light source is the city below. Hold the phone slightly angled to catch your face in the reflection rather than the phone itself. Tap to expose on the city rather than the face, which will let the reflection stay soft and semi-transparent. Night mode works well here as long as you keep the phone steady against the glass.
06. Thunderhead from Above
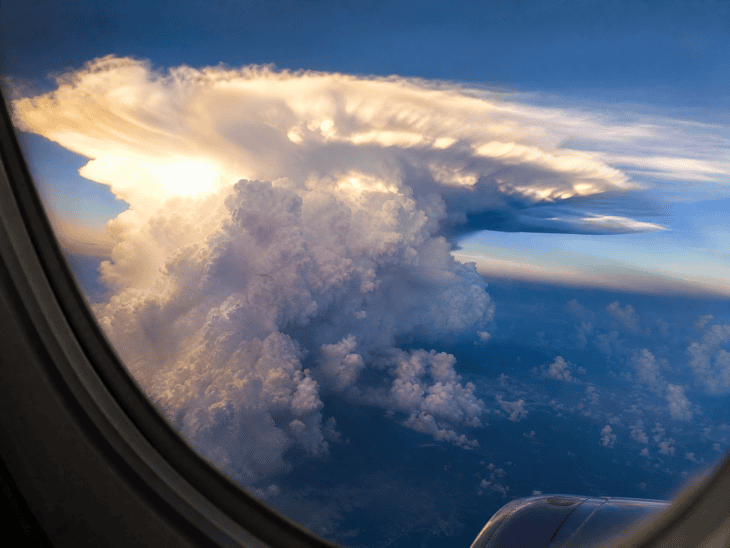
What you see A cumulonimbus tower rising to the level of the aircraft and spreading its anvil top flat against the tropopause, brilliant white-gold where strong sunlight hits it and deep grey-purple in the shadow of its own billowing interior. The scale is hard to grasp: these structures can be taller than Mount Everest. A thin cirrus veil trails from the anvil tip like smoke.
Why it works Most people have only ever seen thunderstorms from below. From cruise altitude you are level with or above the anvil, which reveals the full architecture of one of the most powerful weather systems on earth. The contrast between the brutal scale of the storm and the calm of the pressurized cabin gives the photo its drama.
How to get it Convective weather in summer or tropical routes gives you the best opportunity. Watch for the crew to start detouring around a region of the sky, which usually means there is something dramatic out there. The shot works from a safe distance of 20 to 50 miles, which is exactly where the crew will route you. Clean the window glass for maximum sharpness on the cloud detail, and expose slightly dark to keep the highlights from clipping in the brightest parts of the cloud.
07. Contrail Shadow on the Cloud Layer
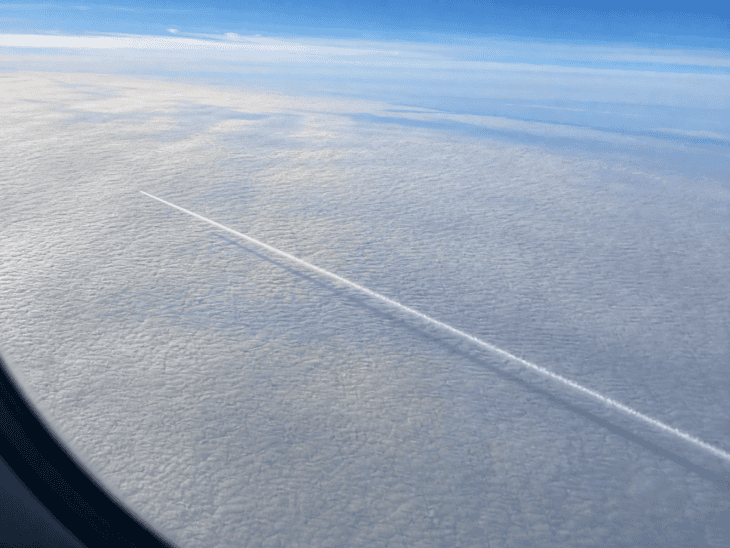
What you see A white contrail cutting across a cloud layer below, and directly beneath it on the cloud surface, a faint dark shadow mirroring the same line. The bright contrail and its shadow create a paired graphic element: a thin white stroke and a thin dark stroke in parallel. The cloud texture around them is soft and the sky above is clean pale blue.
Why it works This is one of those images that rewards attention. The shadow of the contrail on the clouds below is not immediately obvious when you first see it, but the moment a viewer notices it the whole image clicks into place. It is the kind of detail that makes aerial photography feel like a different visual world. If you want to understand what these trails actually are, the science behind contrails is genuinely interesting reading.
How to get it You need a broken or mid-level cloud layer below your flight path and another aircraft at a similar or slightly lower altitude ahead of you. The contrail has to be recent and still dense. Shoot from the window on the sunny side of the aircraft so the contrail is lit from above rather than in shadow. The shot is rare but highly repeatable on busy routes where many aircraft share the same corridor.
08. Snow-Capped Mountain Range Below

What you see A mountain range in full winter white, the peaks throwing hard directional shadows across snowfields in the strong light at altitude. Dark exposed rock breaks through where the slopes are too steep to hold snow. A glacier fills a high valley between ridges, its slow-motion flow visible in the compression of the ice. The sky meets the horizon in a pale band above the farthest peaks.
Why it works Mountains from altitude reveal their true scale and geometry in a way that is invisible from the ground. The elevation of the flight removes the haze that softens mountain photography from valleys, giving the peaks a hard-edged clarity. The shadow play across the snow adds graphic contrast without any color editing.
How to get it Transalpine routes, Pacific Northwest routes in winter, and the longer polar-adjacent corridors on the longest flights in the world all pass over significant mountain terrain. Research the route before you fly to know which side of the aircraft to book. Early morning and late afternoon light gives you the hardest shadows. Cloud cover over the peaks is the main enemy: check forecasts the day before.
09. Tropical Coastline and Turquoise Shallows
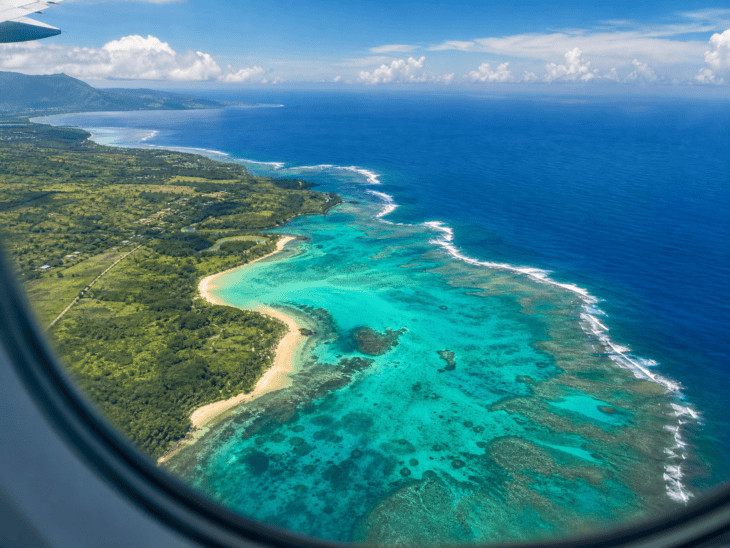
What you see Water that graduates from clear turquoise in the shallows to deep sapphire offshore, sandbars and reef shapes visible as pale and dark shadows beneath the surface. A thin white line of surf marks the beach edge. A strip of dense green land sits at the far edge of the frame. In the right light the shallow water looks lit from within.
Why it works The color gradient from shallow to deep water is one of the most recognizable and satisfying color palettes in all of travel photography. From altitude you can capture the full gradient in a single frame, which is impossible from a beach or boat. No filter can replicate what the actual depth variation does to the color of tropical water in natural light.
How to get it Departure and approach windows on Caribbean, Pacific island, and Southeast Asian routes put you low enough for the water detail to be visible. The window directly over the wing works if the wing does not block the view. Midday sun eliminates shadows on the water surface, while a lower sun angle creates glare. Clear skies are non-negotiable: even thin cloud washes out the color.
10. Patchwork Farmland at Noon
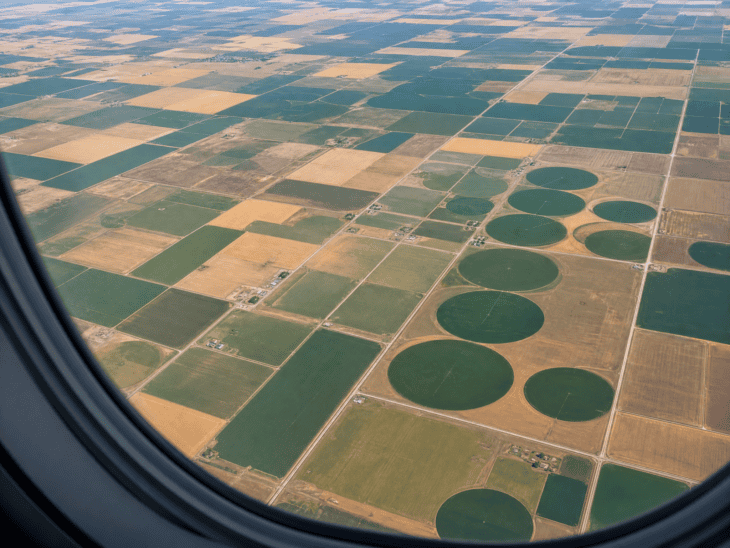
What you see A geometric patchwork of agricultural fields in yellows, greens, and tans, each block a slightly different crop or state of growth. Circular irrigation systems create perfect green discs stamped against bare brown earth. Thin roads divide the sections. The scale compresses everything into something that reads as much like a graphic design as a landscape.
Why it works Human agriculture from altitude is one of the most consistently compelling abstract subjects in aerial photography. The regularity of the fields and the color variation between them create a visual rhythm that works in almost any composition. It is also a shot that is available on the majority of domestic and continental routes, not just scenic flights.
How to get it The central and western United States, central Europe, and the Australian interior all deliver exceptional farmland geometry. Midday overhead sun eliminates shadows and maximizes color saturation in the crops. Altitude between 20,000 and 35,000 feet keeps individual fields large enough to show detail without becoming too compressed to read. Shoot straight down rather than toward the horizon for the most graphic quality.
11. Minimalist Blue Sky and Wingtip

What you see A clean arc of wingtip against deep, cloudless blue. The wingtip device curves upward in a precise architectural sweep, the aluminum surface catching a cool grey light. No clouds, no horizon, no other reference point: just the curve of the wing and the blue. The composition places the wing in the lower third and lets the sky dominate.
Why it works Minimalism in photography is about removing everything that does not serve the composition. This shot has almost nothing in it, which is exactly what makes it work. The curve of the wingtip against the blue is a genuinely beautiful shape, and the absence of context forces the viewer to focus on it. It is one of the most technically easy shots on this list and one of the most shareable.
How to get it You need the seat directly over or just behind the wing, and a clear-sky day. Tilt the phone slightly upward so the horizon is out of frame. Expose on the sky rather than the wing to keep the blue deep and saturated. The best blue occurs at cruise altitude where the atmosphere above you is thinner. Avoid polarized window shades if the aircraft has them: they add uneven color casts across the frame.
12. River Delta from Altitude
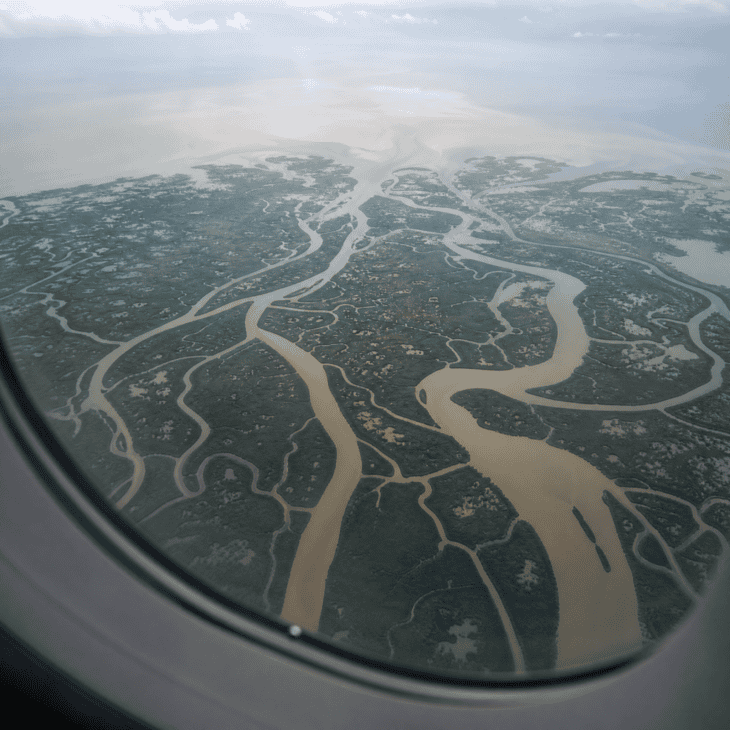
What you see A river fracturing into dozens of channels that branch and meander across a flat coastal plain in a pattern that looks organic and almost biological: like the veins of a leaf, or the branches of a tree seen from above. Wetland vegetation fills the gaps between channels in dark green. Sediment plumes cloud the water where the channels reach the sea.
Why it works River deltas are one of nature’s most recognizable geometric patterns. From the ground, a delta is just mud and water. From altitude it becomes one of the most visually complex and interesting landscapes you can photograph from a window seat. The branching pattern has an almost fractal quality that makes the image work at any zoom level.
How to get it The Mississippi delta, the Nile, the Rhine estuary, and dozens of smaller deltas sit beneath busy flight routes. Research your route using a flight tracking app before you board to know if you pass over a major delta and which side of the aircraft it will appear on. Overcast lighting works well here since it removes the directional shadow that can obscure the channel detail.
13. Iridescent Cloud Colors
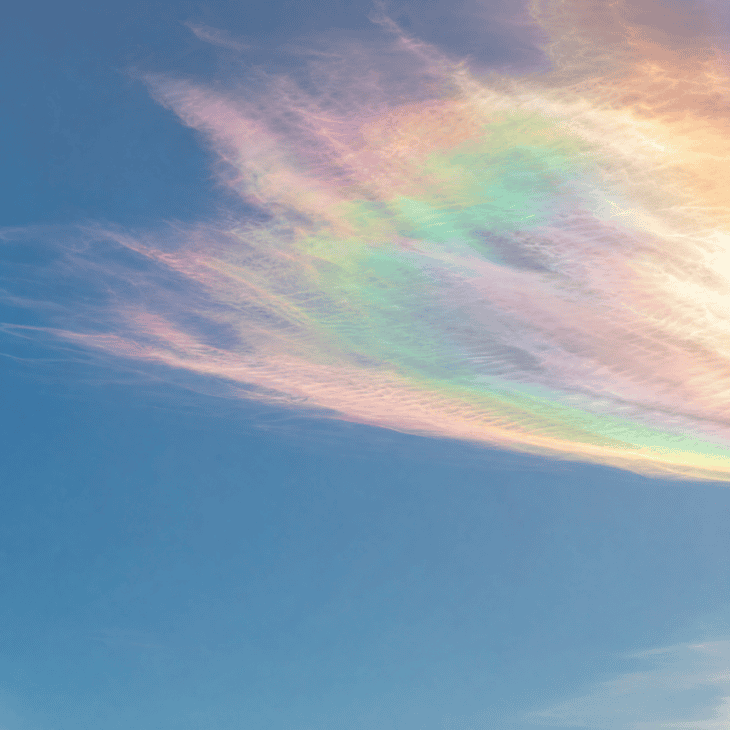
What you see A patch of thin cloud near the sun showing bands of pink, green, violet, and gold shimmering across its surface. The colors shift as the angle of view changes, the light diffracting through ice crystals in the cloud layer. The rest of the sky is plain pale blue, which makes the iridescent patch look almost painted in by hand. It is one of the most visually striking effects in aviation meteorology.
Why it works Most people have never seen cloud iridescence because it requires a specific thin ice crystal layer close to the sun and you usually need to be at altitude or looking in the right direction at the right moment. It looks unreal in photos because it looks unreal in person. If you want to understand what you are actually seeing, different cloud types and how they form is worth reading before your next flight.
How to get it Look near the sun but not at it. Iridescence typically appears within about 10 to 30 degrees of the sun in thin alto or cirrostratus clouds. Block the sun from your view with your hand or the window frame and scan the clouds nearby. The effect is strongest in the minute or two before the cloud layer thickens or dissipates. Use a slightly underexposed shot to preserve the color rather than letting the bright area clip to white.
14. Arctic Ice Field
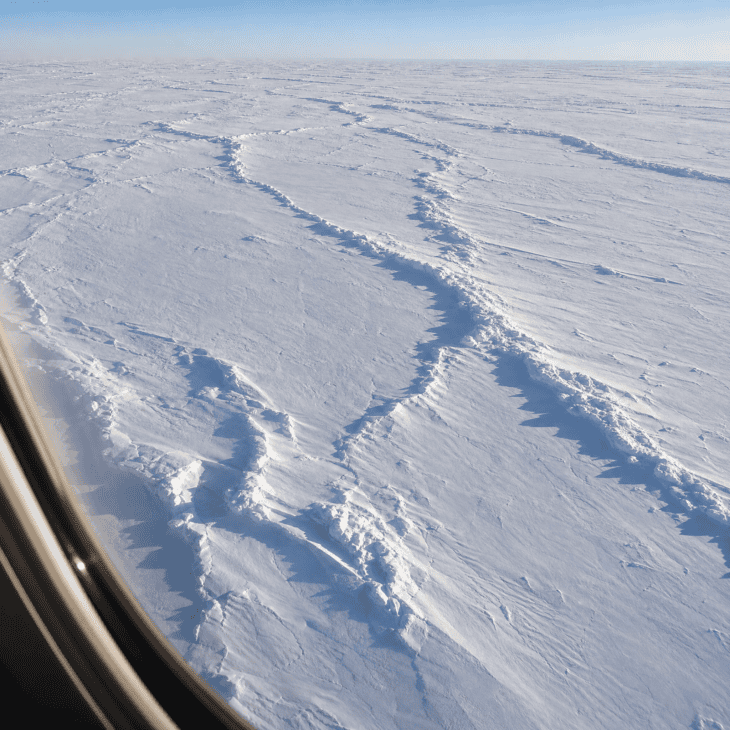
What you see A flat white world interrupted only by pressure ridges, the cracks and folds in the ice casting long dark shadows in low-angle polar light. The surface shifts between bright white where the ice is intact and blue-grey in the shadow of the ridges. The horizon is a perfectly flat line of white meeting pale blue sky. It is a landscape so simple it barely seems real.
Why it works The ice field is the ultimate minimal landscape. The near-total absence of color and the flatness of the terrain turn the photo into something closer to an abstract painting than a documentary image. The pressure ridges provide just enough texture and shadow to make the surface readable. The shot rewards slight underexposure to keep the shadow detail rather than blowing out the bright ice surface.
How to get it Polar routes over Greenland, Iceland, northern Canada, and Arctic Scandinavia give you ice field views in winter. Long-haul transatlantic and transpacific routes often pass over Greenland ice. Research the waypoints your specific route uses and book a window seat on the side that faces north. The sun stays low on the horizon at high latitudes even at midday in winter, which gives you the long shadow play on the ridges.
15. Foggy City at Sunrise
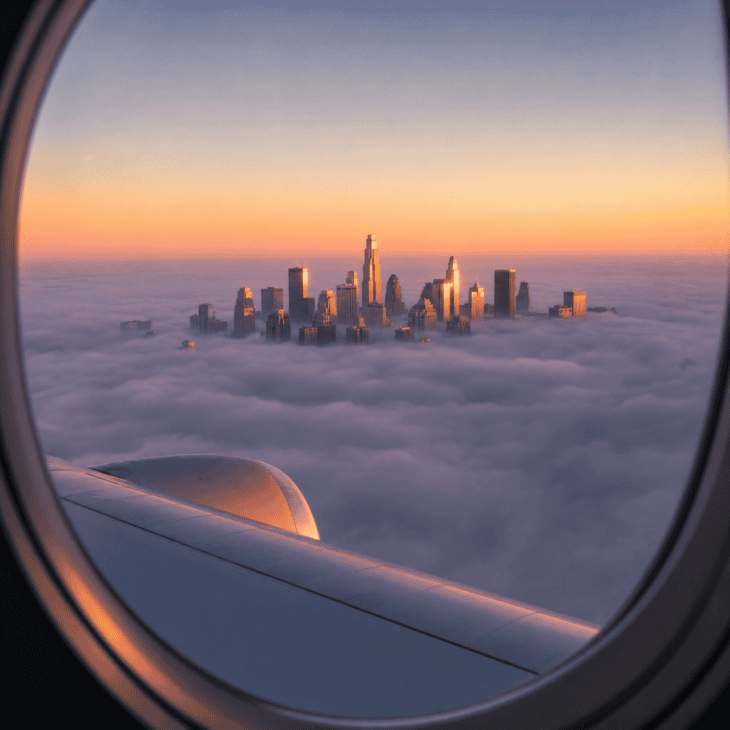
What you see A downtown skyline with only the upper floors of the tallest buildings visible above a smooth grey fog blanket. The buildings catch warm peach and amber sunrise light while the fog surface above them glows in cool lavender. The color contrast between the warm architecture and the cool fog creates a naturally layered scene that looks composited but is entirely real.
Why it works Fog over a city at sunrise is one of the most cinematic views available from a window seat. The combination of warm morning light and cool fog, familiar city shapes made mysterious, and the specific perspective of approach makes this shot feel like a movie establishing shot. It is also fleeting: the fog burns off quickly once the sun is up, and you only see it at the right approach altitude.
How to get it Early morning arrivals into coastal or valley cities are your best opportunity. Calm conditions and high humidity overnight reliably predict morning fog, so check the destination weather forecast the day before. Choose a window seat toward the front of the cabin on final approach since the angle is slightly better for looking down into the city. The optimal shooting window is roughly 2,000 to 8,000 feet on descent.
Phone mode for window shots
Disable HDR processing for dramatic sky and cloud shots. HDR flattens the contrast between bright clouds and dark sky that makes these images work. Shoot in standard or night mode instead, and handle any exposure adjustments manually by tapping to choose your metering point.
16. Wing Flex in Turbulence
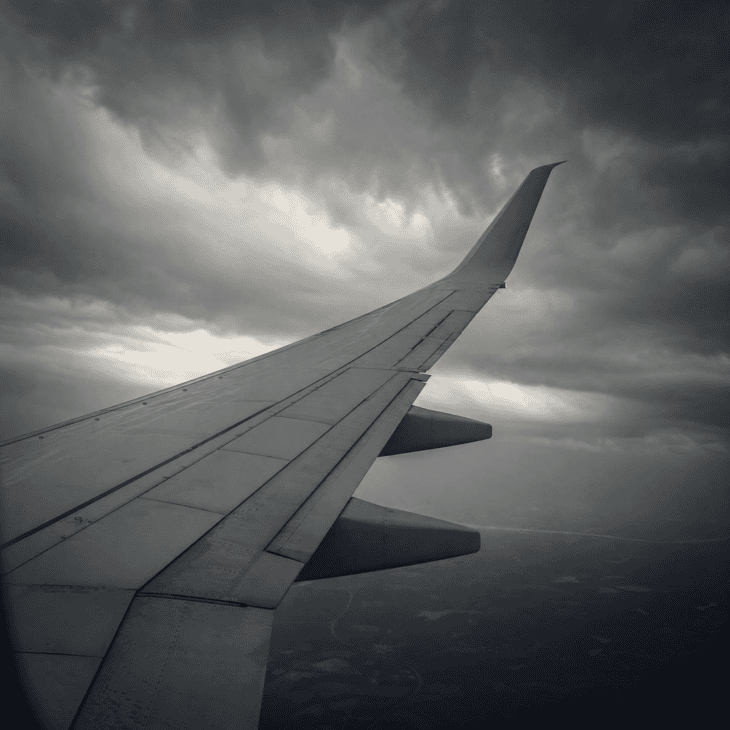
What you see The wing in a pronounced upward curve, the flex more dramatic than most passengers realize is normal. The wingtip sits visibly higher than the wing root, the aluminum skin holding a shape that looks briefly impossible. A dark overcast sky behind it adds to the drama. Rain streaks on the window glass frame the shot in something that feels very close to weather.
Why it works Wing flex is one of those details that surprises passengers who have never noticed it. Wings are designed to flex considerably, and in turbulence the range of motion becomes visible in a way that feels almost alarming if you do not know what to expect. A photo that captures this honestly tells a true story about what flight actually is. Routes known for rougher air, like the most turbulent flight routes, naturally give you the most opportunities for this shot.
How to get it You need a window seat directly over the wing. Turbulence is obviously not on demand, but convective activity in summer afternoons, mountain wave turbulence on certain routes, and jet stream crossings all offer the flex shot. Have the phone ready with the lens against the window when the seatbelt sign comes on. Burst mode helps: take 10 to 15 frames in rapid succession and choose the one with the most dramatic flex.
17. Sunset Gradient Horizon Layers
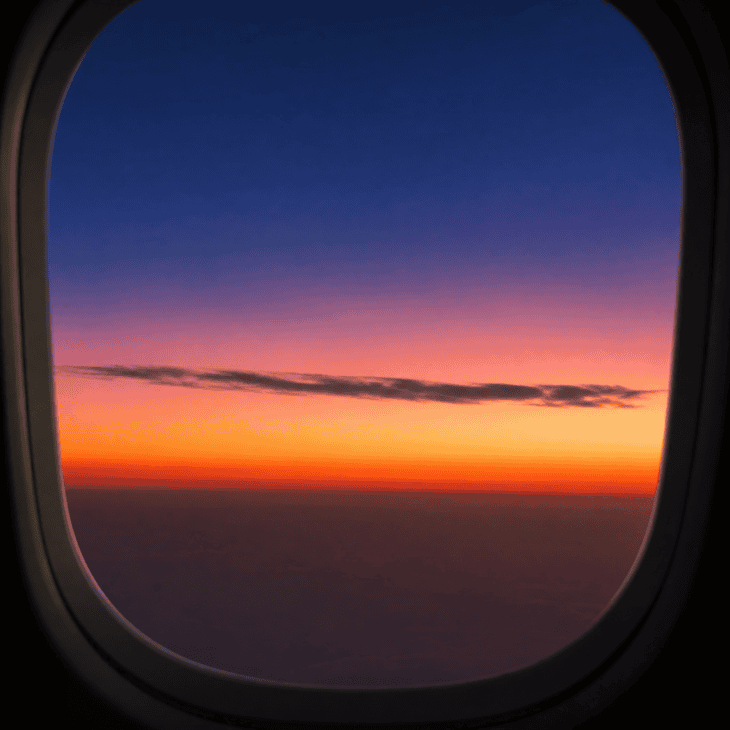
What you see The horizon in distinct stacked bands: deep orange at the very base, softening through rose and pale gold into lavender, then finally the deep blue of the upper atmosphere at the top of the frame. A single thin cloud silhouette crosses the gradient like a brushstroke. No land, no wing, no reference point: just pure atmosphere in layers.
Why it works The gradient from warm to cool across a sunset sky is one of the most naturally photogenic views on earth. At altitude you see a version of this that is impossible from the ground: the atmosphere is thinner, the colors are more saturated, and you can see the full band from the orange of the low sun to the true blue-black of the upper sky all in a single unobstructed frame.
How to get it Westbound flights at the right time of day will pace the sunset for 20 to 40 minutes, extending the golden hour dramatically. Choose a seat that faces the sunset direction. Tilt the phone to eliminate the wing from the frame entirely, framing just the horizon and sky. Expose for the midrange of the gradient: a middle value between the bright orange and dark blue. Shooting in landscape orientation captures the width of the gradient better than portrait.
18. Engine Nacelle at Dusk
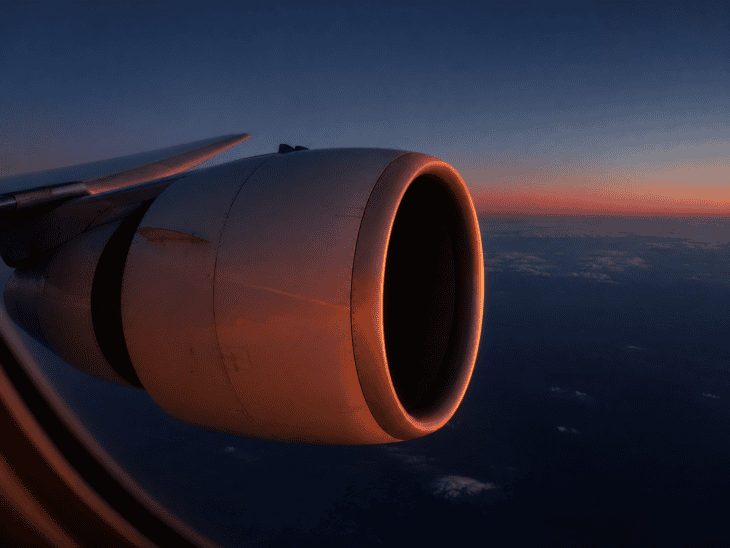
What you see The engine cowling in the last amber light of the day, the intake circle a perfect dark oval at the front of the nacelle. The wing root disappears into deep blue twilight behind it. A faint heat shimmer halos the rear of the engine. The sky behind is a gradient from rose at the horizon to deep blue above. The machine looks both industrial and beautiful in this light.
Why it works The engine is a design object as well as a piece of engineering, and dusk light treats it accordingly. The warm-to-cool color contrast between the lit nacelle and the blue sky behind it creates a naturally cinematic look without any editing. It is also one of the few aircraft details that reads as dramatic rather than technical in a photograph.
How to get it You need a seat just forward of the engine on a wing-mounted engine aircraft. Look at the seat map before booking: the engine usually sits roughly under rows 20 to 25 depending on the aircraft type. Expose on the engine nacelle directly so the metal is correctly lit and the sky goes pleasingly dark behind it. The window on the non-sun side gives you the engine against a darker sky, which makes the dusk color richer.
19. Moonrise Over the Wing
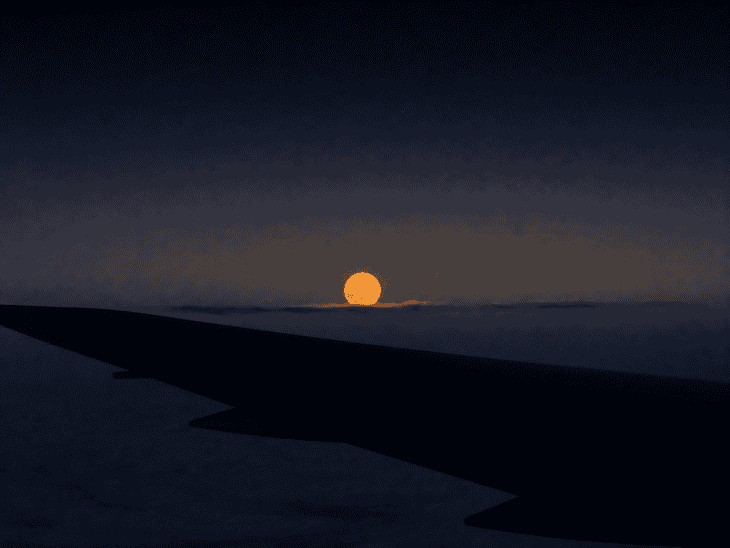
What you see A full moon sitting just above the horizon of the wing, warm orange-yellow in its early rise from the earth’s shadow. The wing below it is a dark silhouette. The sky graduates from pale grey at the horizon through deep navy at the top of the frame. A single thin cloud crosses below the moon like a detail added for composition. It is quiet in the way that very few photographs manage to feel.
Why it works A rising moon at altitude looks large, warm, and close. The scale relationship between the moon and the wing gives the image a sense of proportion that makes the moon seem enormous. The low angle of the moonrise also produces the strongest orange coloration, something that fades quickly as the moon rises higher. This is a timed shot with a narrow window.
How to get it Track the lunar calendar before your flight and look for full or near-full moon dates. Apps that show moonrise times and directions let you calculate which side of the aircraft to book based on your route bearing. Night mode on most phones handles the exposure well; press the lens against the glass to eliminate cabin reflections. You have about 10 to 15 minutes before the moon rises too high and loses its orange color.
20. Golden Desert at Low Sun
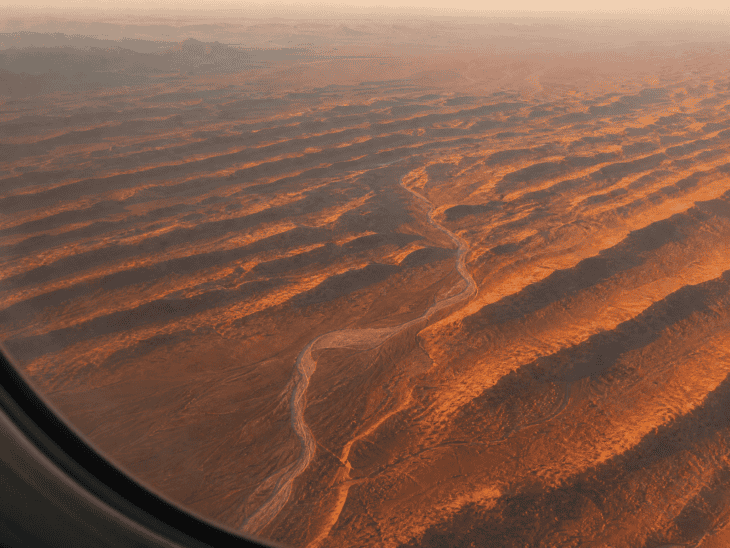
What you see Sand and rock in deep amber and burnt orange, dune ridges throwing long parallel shadows that stripe the landscape in a regular rhythm. A dry river channel cuts a pale winding line through the orange terrain. The horizon is slightly hazy with desert dust. The color saturation is almost brutal in low afternoon light, nothing like the washed-out desert visible on overcast days.
Why it works Desert landscapes absorb and intensify low-angle light in a way that temperate terrain does not. The combination of warm color, dramatic shadows, and the abstract geometry of dune patterns gives the photo a graphic quality that works even at high altitude when individual features are small. It is one of those landscapes that improves with altitude rather than suffering from the distance.
How to get it Middle Eastern routes, trans-Saharan corridors, Australian outback overpaths, and desert Southwest US routes all cross significant desert terrain. Afternoon or early morning light on the correct side of the aircraft gives you the best shadow play. Research the bearing of your route and the sun angle at your estimated crossing time to decide which window to sit at. Standard photo mode outperforms automatic HDR here since HDR compresses the shadow contrast that makes the dunes dramatic.
21. The Oval Window as Portrait Frame
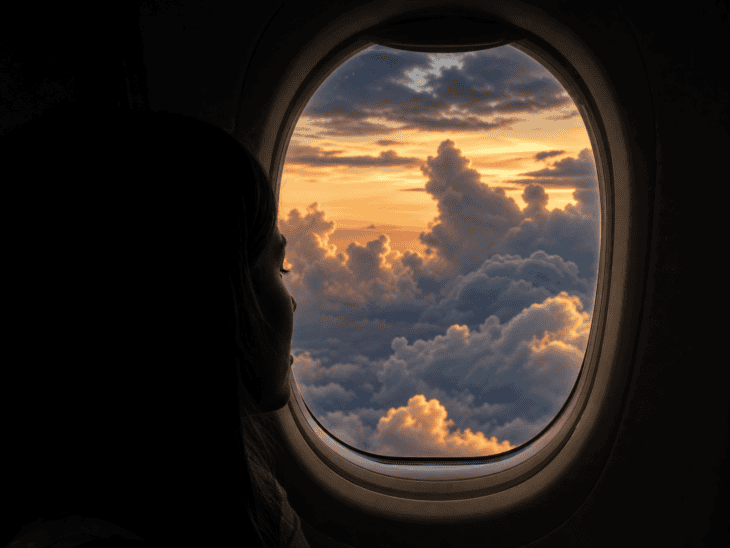
What you see A silhouette at the window, face turned toward the glass, framed inside the oval. The cabin behind is dark and underexposed so the subject reads only as shape. All the color and light comes from outside: a dramatic cloudscape fills the background. The oval window frame acts as a natural vignette, focusing everything inward. The image is about looking out rather than looking in.
Why it works The round shape of aircraft windows is not just an engineering decision but a naturally beautiful frame. Using it deliberately as a compositional tool, rather than just shooting through it, turns the window itself into part of the image. The silhouette approach means the shot works for any travel companion without needing to worry about whether they are looking at the camera.
How to get it Sit one row back and slightly toward the aisle to get both the window and the passenger in the frame at the right angle. Turn off the reading light so the subject goes dark. The exposure should be set on the sky outside: let the cabin go dark and the subject become a silhouette. A dramatic sky outside, whether clouds, sunset, or a dark night, is more important than any aspect of the framing inside the cabin.
22. Abstract Tarmac Geometry
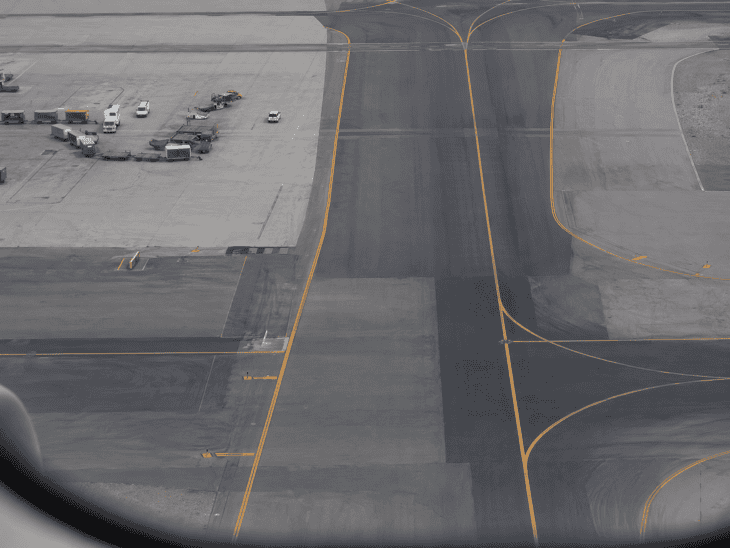
What you see Dark grey tarmac striped with yellow and white taxiway markings, the lines crossing and converging in a pattern that reads as pure graphic design from above. Ground service vehicles appear as small colored shapes: orange cones, yellow vehicles, blue tow trucks. The perspective at low taxi altitude compresses the scene just enough to flatten it into something more abstract than photographic.
Why it works Most passengers put their phones away during taxi and miss some of the most graphically interesting views of the entire flight. The close proximity to the ground on taxi gives you a different kind of abstraction than cruise altitude: lines and shapes rather than landscapes. The markings themselves have a bold graphic quality that translates well to a square social media crop.
How to get it Have your phone ready before push-back and keep it out during the full taxi sequence, which can take 5 to 20 minutes at a large airport. Look straight down through the window rather than at the horizon. Shoot at the moment the wing passes over interesting ground markings or equipment. Overcast light eliminates the harsh shadow from the wing itself that can intrude on the shot in strong sun.
23. The Window Seat Flat-Lay

What you see A coffee cup, a paperback, a pair of headphones, and a boarding pass arranged casually on the tray table, the window behind them showing a soft cloud layer in warm morning light. The arrangement looks natural rather than posed, the objects overlapping slightly as they would if you had just set them down. Warm neutral tones throughout, the outside light doing most of the work.
Why it works The flat-lay approach turns the window seat into a lifestyle image rather than a travel documentary. It invites the viewer into the experience rather than showing them the view. The window and the clouds serve as the background, grounding the image in aviation without making the plane itself the subject. It is the most consistently high-performing format in travel content because it is both specific and aspirational.
How to get it Keep the arrangement simple: three to five items maximum. Overlap them slightly so the layout does not look too deliberate. Shoot from directly above if possible, or at a shallow angle if the overhead space does not allow it. Turn the phone to fill the frame with tray table and window, cutting out the seat back and overhead bin. Morning and late afternoon window light keeps the scene warm. Remove anything with a visible logo before you shoot.
Keep it simple
The most compelling window seat flat-lays use a maximum of five objects. More than that and the eye does not know where to look. Remove anything with a visible logo before you shoot, and let the window and outside view do the heavy lifting.
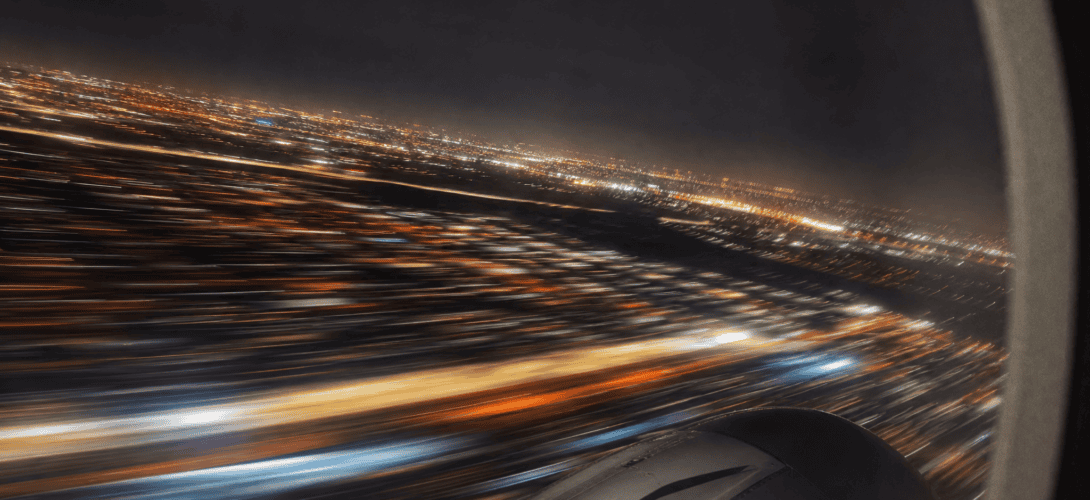
24. Departure Motion Blur
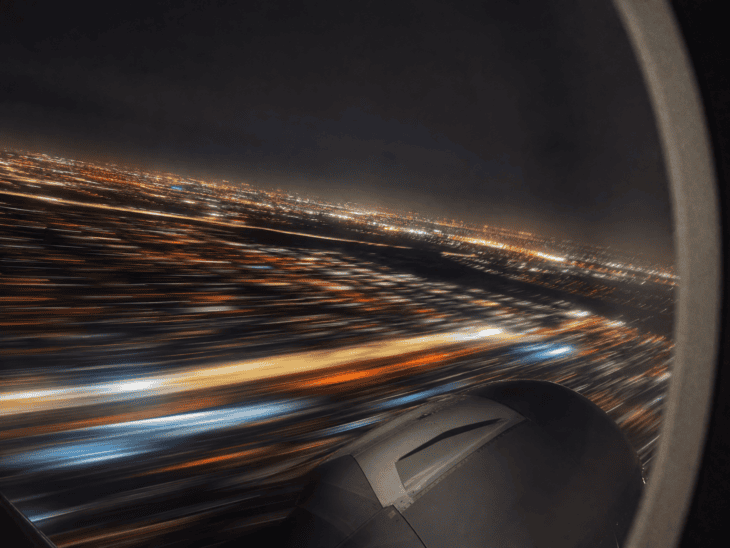
What you see City lights stretched into amber and white trails, some horizontal, some curved, following the motion of the aircraft as it climbs and banks. The motion blur turns the ordered grid of the city into something painterly and abstract. A few stationary lights remain sharp where the motion was perpendicular to the camera. The sky above is deep and clean dark.
Why it works Long exposure photography produces images that a camera at normal shutter speeds cannot capture. The motion of the aircraft during departure, combined with the density of city lights below, creates a blur pattern that is specific to this kind of photography at this particular moment in a flight. The image shows you what it feels like to depart a city at night rather than what it looks like.
How to get it Use a long exposure or light trail mode on your phone, or switch to Pro or manual mode and set a shutter speed of 1 to 3 seconds. Hold the phone against the glass to minimize vibration beyond the aircraft’s own motion. The bank during the departure turn produces the best curved light trails. Night departures from dense urban airports give you the highest concentration of lights to work with. This is one of those shots where the camera movement becomes the entire point of the image.
25. Deicing Morning: Frost and Spray
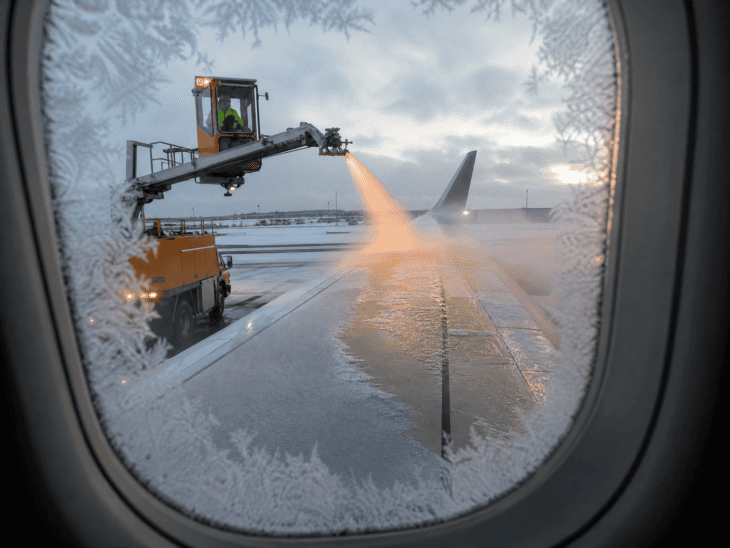
What you see Delicate frost crystals at the edges of the window frame, their patterns sharp and intricate in the cold. Outside, a ground crew vehicle sprays orange-tinted deicing fluid across the wing in a fine mist that catches the flat winter light. The wing surface shows the transition from white frost to clear wet where the fluid has already been applied. A grey winter sky sits behind everything.
Why it works Winter ground operations are one of the most visually distinctive moments in aviation photography that most passengers never document. The frost crystals on the window frame create natural foreground interest, while the deicing spray provides background action and color. The orange tint of the fluid against a grey winter scene is one of the more distinctive aviation color palettes, and unlike most of these shots, this one exists only on the ground.
How to get it Winter morning flights into or out of cold-weather airports are your opportunity. The frost forms on the outer pane during very cold nights on the ground. Get to the gate early and board as soon as possible to claim your window seat and be in position before deicing begins. Shoot with the frost in the foreground of the frame and the deicing operation behind it. The moment the fluid hits the wing is the best 30 seconds of the shot: be ready before the truck moves into position.
About the Author

Hanna writes AeroCorner's aviation-lifestyle and decor guides, turning a love of flight into ideas for your home, celebrations, and gift lists.